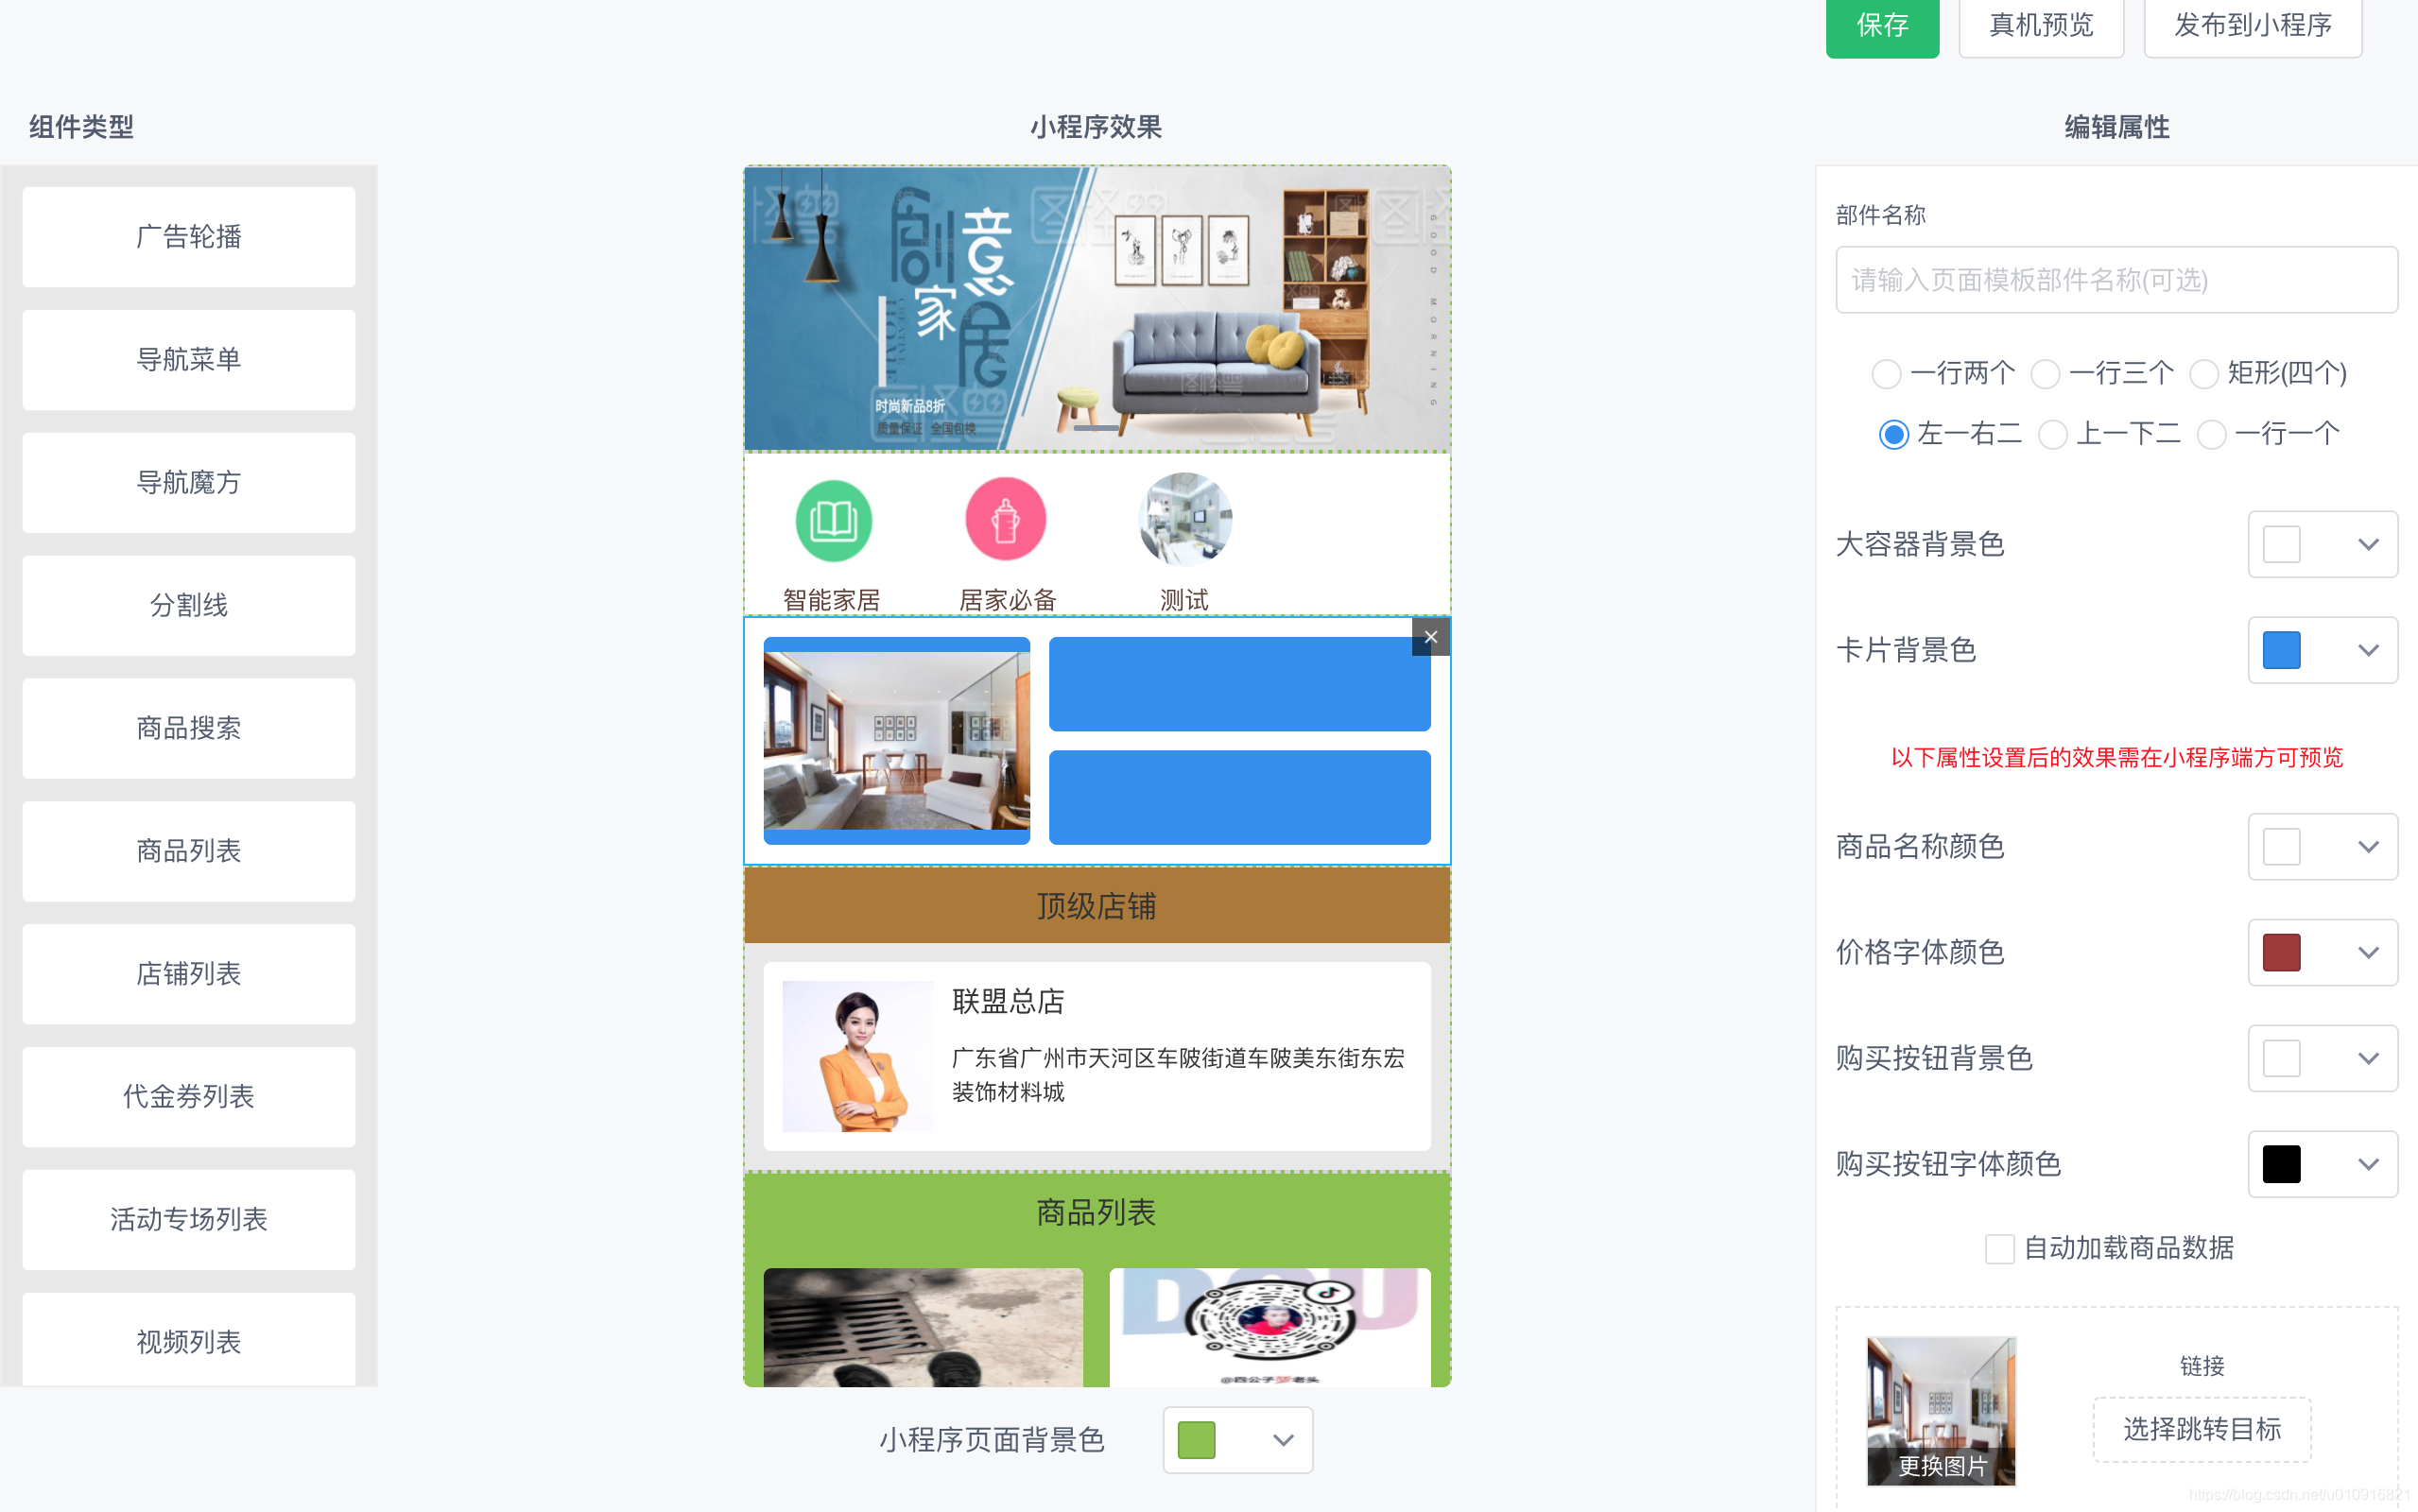
功能操作流程
- 从左侧拖入组件到中间容器内。左侧组件不变,只是clone节点到中间容器。
- 中间容器不可再拖入左侧。中间容器各个部件可以在容器内上下拖动进行排序。
- 支持同类型多组件。从左侧拖入相同组件的时候,会先从中间容器拷贝同类型的部件。重用样式。每个部件id值唯一。
- 中间容器 选中某个部件,在选中的部件右上角显示删除按钮。右边显示对应的部件属性。
- 修改右边对应的部件属性,中间容器对应的部件可实时显示效果。
- 右边部件的属性根据 每个部件的类型不同而决定。
- 中间容器下方底部可设置大容器的页面背景颜色。
- 最后提交保存全部部件的属性。这样就完成了一个页面模板。 下次页面模板编辑的时候,页面进入直接显示实时效果。
插件配置
我们在package.json文件中导入vuedraggable插件1
2
3"dependencies": {
"vuedraggable": "^2.23.2"
}DragList组件布局与属性配置
在我们自定义的组件DragList中开始布局,首先引入vuedraggable。
1 | <!--定义左边的组件容器 --> |
我们对draggable组件都绑定了@input 和 @end 事件,然后通过属性:options来设置这两个容器的属性配置。通过:value来绑定数据源。接下来我们看js的配置。
1 | import draggable from 'vuedraggable' |
通过options1属性,我们约定了左边可选组件和容器组件都属于一个group:drag_list,不同的是,options1约定左侧组件pull拖出的时候是属于克隆,put控制不可拖入。sort控制不可进行拖动排序。options对应的容器只设置了group组,其他属性不设置。默认开启。
容器的背景色变化:1
2
3
4
5
6
7
8
9
10created:function(){
this.containerBgColor = this.mpContainerBgColor; //首次给颜色器填充颜色
},
watch:{
containerBgColor:function(newValue,oldValue){
// console.log('颜色发生改变,需要传递到父容器');
this.$emit('on-mpContainerBgColor-change',newValue);
}
},
wechatAppViewer页面布局
1 | <DragList ref="DragList" :list1.sync="list1" :list2.sync="list2" @on-mpContainerItemAdd="chooseSelectedMPItemLayout" |
1 | data() { |
draggable 拖动组件到容器
1 | methods: { |
当左侧拖动UI组件到右侧的时候,对数据对象进行copy一份,然后生成唯一的mpItemId,以保证可以拖入重复的UI组件。然后设置list2的新数据。最后回调on-mpContainerItemAdd事件,把新数据传递到最右侧的属性显示器组件中。1
2
3
4
5
6
7
8 //选中小程序页面部件
chooseSelectedMPItemLayout: function(e) {
this.selectedMPItemId = e.mpItemId;
let that = this;
this.$nextTick(() => {
that.$refs.EditConfigOptions.initial(e, 'modify');
});
}
EditConfigOptions组件的initial方法,1
2
3
4
5
6
7
8
9
10
11
12
13
14
15methods: {
initial: function (t, k) {
this.handleReset(), this.isVisible = true, this.pageId = this.$route.query.id, this.payload = t;
k == 'modify' ? (this.isEdit = true, this.modifyId = t.itemId, this.detailDecorateGroup(t)) : (this.isEdit = false);
this.typeList.forEach(e => {
if (e.id == this.payload.type) {
this.options = e.options;
}
});
console.log("对象点击属性。。。。");
this.validate(); //让对象属性config进行回传;
}
}
当选中某一个已添加到容器的组件时
1 | <div shadow class="drag-right-item" slot="right" slot-scope="right" v-bind:class="selectedMPItemId==right.itemRight.mpItemId?'MPItemLayoutSelectedShowBorder':'MPItemLayoutNormalShowBorder'" |
当点击时候,需要把某项数据对象传递到属性编辑器组件中。当点击删除按钮时候,删除list2某一项数据。根据mpItemId找出对应的item下标进行删除该对象。1
2
3
4
5
6
7
8
9
10
11
12
13
14
15
16
17delMpItemLayoutCompoment: function(data) {
let that = this;
this.$Modal.confirm({
title: '提示',
width: 280,
content: '<p>是否删除改组件</p>',
onOk: () => {
that.list2.splice(that.list2.findIndex(item => item.mpItemId === data.mpItemId), 1);
},
onCancel: () => {
}
});
},
}
编辑属性容器组件
1 | <EditConfigOptions ref="EditConfigOptions" @on-options-change="refreshMiniProgramLayout"></EditConfigOptions> |
EditConfigOptions里的组件属性发生变更时,将会触发refreshMiniProgramLayout方法,当数组里某对象发生变更时候,记住需要用this.$set方式重写对数组某一下标对象覆盖,这样才会触发list2.sync变更和刷新1
2
3
4
5
6
7
8
9
10
11
12
13
14
15
16refreshMiniProgramLayout: function(mpItemId, options) {
let findObjIndex = this.list2.findIndex(item => item.mpItemId === mpItemId);
//list2找到该对象,则处理。找不到,可能删除了就不处理。
if (findObjIndex != -1) {
let mpItemLayoutObj = this.list2[findObjIndex];
mpItemLayoutObj.config = options;
this.$set(this.list2, findObjIndex, mpItemLayoutObj);
//需要触发数组的set方法,文档节点才会更新。
}
if(this.originItemConfigs.length == 0){
//记录页面加载进来的原有小程序样式字符串。用于判断是否变更。
this.originItemConfigs = this.getMpLyaoutItemsConfigStr();
}
}
我们来看EditConfigOptions组件是如何对所有属性做到监听的。1
2
3
4
5
6
7
8
9
10
11
12
13
14
15
16
17
18
19
20
21
22
23
24
25
26
27
28
29
30
31
32
33
34
35
36handleReset() {
this.isActive = false;
this.options = [];
this.category = [] //链接类型
this.target = [] //目标类型
this.navigation = [] //图文导航
this.navigator = [] //图文导航
this.navigate = [] //图文导航
this.division = [] //分割线图片
this.key = null;
this.isShow = false;
this.operationForm = {
style: '',
styleName: '', //商家信息 //优惠券 //
containerBgColor: '', // 大容器背景颜色
cardBgColor: '#ffffff', // 卡片背景色
moduleTitle: '', //部件名称
titleColor: '#333333', //店铺名称颜色
cardTextColor: '#ffffff', //卡片字体颜色
priceColor: '#EE2C2C', //价格颜色
purchaseButtonBgColor: '#EA1A1A', //购买按钮背景色
purchaseButtonTitleColor: '#ffffff', //购买按钮字体颜色
ProgressBgColor: '#ffffff', //进度条背景色
APProgressBgColor: '#ffffff', //已完成进度条背景色
subtitle: null,
linkType: null, //
linkTargetId: null,
headTitleColor: '#333333', //头部文字颜色
headBgColor: '', //头部背景色
headerTitle:'',
bgColor: '#ffffff',
timeColor: '#999999',//有效期颜色 -- 代金卷
amountColor: '#999999', //原价颜色 -- 代金卷
}
},
通过watch方法对这些对象属性或者数组变更进行监听1
2
3
4
5
6
7
8
9
10
11
12
13
14
15
16
17
18
19
20
21
22watch:{
operationForm:{
handler(newValue,oldValue){
if(Object.is(newValue,oldValue)){
this.validate();
}
},
deep:true //监听对象每一个属性的变化
},
navigation:{
handler(newValue,oldValue){
console.log("navigation菜单发生监听变化。");
},
deep:true
},
navigator:{
handler(newValue,oldValue){
console.log("navigator魔方发生监听变化。");
},
deep:true
},
},
当每次用户选中某容器的时候都会调用EditConfigOptions组件的initial方法:1
2
3
4
5
6
7
8
9
10
11
12
13
14
15
16
17
18
19
20
21
22
23
24
25
26
27
28
29
30
31
32
33
34
35
36
37
38
39
40
41
42
43
44
45
46
47
48
49
50
51
52
53
54
55
56
57
58
59
60
61
62
63
64initial: function (t, k) {
this.handleReset(), this.isVisible = true, this.pageId = this.$route.query.id, this.payload = t;
k == 'modify' ? (this.isEdit = true, this.modifyId = t.itemId, this.detailDecorateGroup(t)) : (this.isEdit = false);
this.typeList.forEach(e => {
if (e.id == this.payload.type) {
this.options = e.options;
}
});
this.validate(); //让对象属性config进行回传;
},
//验证表单是否通过
validate() {
let t = this, result = {};
if (typeof t.operationForm.checkbox == "undefined"){
t.operationForm.checkbox = false;
}
switch (t.payload.type) {
case 10:
//页面背景组件
result = {
bgColor: t.operationForm.bgColor
}
this.handleConfirm(result)
break;
case 101:
//商户信息
result = {
style: t.operationForm.style,
containerBgColor: t.operationForm.containerBgColor,
cardBgColor: t.operationForm.cardBgColor,
titleColor: t.operationForm.titleColor,
}
this.handleConfirm(result)
break;
case 201:
//普通商品列表
result = {
style: t.operationForm.style,
containerBgColor: t.operationForm.containerBgColor,
cardBgColor: t.operationForm.cardBgColor,
titleColor: t.operationForm.titleColor,
priceColor: t.operationForm.priceColor,
headTitleColor: t.operationForm.headTitleColor,
headerTitle:t.operationForm.headerTitle,
headBgColor: t.operationForm.headBgColor,
purchaseButtonBgColor: t.operationForm.purchaseButtonBgColor,
purchaseButtonTitleColor: t.operationForm.purchaseButtonTitleColor,
}
this.handleConfirm(result)
break;
//等等......
}
},
handleConfirm(result) {
//属性编辑的实时结果
Object.assign(result,{moduleTitle:this.operationForm.moduleTitle});
let optionsStr = JSON.stringify(result);
console.log(optionsStr);
console.log("回传了");
this.$emit('on-options-change', this.mpItemId,result);
},
当属性变更即时发生数据json回传,然后替换对应的list2对象。这就实现了属性实时编辑立即展现效果的功能。
数据模板变动,提示用户需保存
在wechatAppViewer页面路由变化处进行拦截判断:1
2
3
4
5
6
7
8
9
10
11
12
13
14
15
16
17
18
19
20
21
22beforeRouteLeave: function (t, e, i) {
let mpItemsConfigStr = this.getMpLyaoutItemsConfigStr();
if(mpItemsConfigStr != this.originItemConfigs){
let that = this;
this.$Modal.confirm({
title: '提示',
width: 280,
okText:'保存',
content: '<p>模板已变动,是否需要保存?</p>',
onOk: () => {
that.mpItemUpdateBatch("exit");
},
onCancel: () => {
//离开页面;
i();
}
});
return;
}
i();
},1
2
3
4
5
6
7
8
9
10
11
12
13
14
15
16
17
18
19
20
21
22
23
24
25
26
27
28
29
30
31
32
33//获取小程序页面布局所有的部件configs字符串
getMpLyaoutItemsConfigStr(){
let t = this;
//循环所有,进行拼接。
var configOptionsArr = new Array();
//追加背景
if(t.backgroundMpLayoutItem){
if(t.backgroundMpLayoutItem.config){
configOptionsArr.push({
config: t.backgroundMpLayoutItem.config,
title: '',
type: t.backgroundMpLayoutItem.type
});
}else{
configOptionsArr.push({
config: {bgColor:t.mpContainerBgColor},
title: '',
type: t.backgroundMpLayoutItem.type
});
}
}
for (let i = 0; i < t.list2.length; i++) {
let mpItemObj = t.list2[i];
configOptionsArr.push({
config: mpItemObj.config,
title: '',
type: mpItemObj.type
});
}
return JSON.stringify(configOptionsArr);
}
保存模板数据到服务器
1 | mpItemUpdateBatch(cmdStr) { |
升级适配 Vue3, VueDraggable 4.X
slot 插槽废弃
vue slot 插槽 官方文章中描述了在vue 2.6.0 slot 和 slot-scope 已被废弃,使用新的统一语法 v-slot。1
2在向具名插槽提供内容的时候,我们可以在一个 <template> 元素上使用 v-slot 指令,并以 v-slot 的参数的形式提供其名称。
v-slot:header 可以被缩写为 #header。
解构插槽属性
以下举例:1
2
3
4
5<slot name="right" :itemRight="element"></slot>
那么在实现处是:
<template v-slot:right="right">
业务代码:取值{{right.itemRight.value}}
</template>
假设以上slot无属性传递,只有name, 实现时直接是 < template #right=”right”> 业务代码 </ template>
注意name值写法最好采用驼峰命名,如果有特殊符号比如left-title 就识别不了,需要写成 name = ‘leftTitle’
.sync 废弃
vue3 v-model:属性 取代 属性.sync
segmentfault文章参考
Vue 2.x在组件传递prop时候,子组件里使用prop,但不能修改prop。如果要修改,则需要v-model来设置,但由于局限一个model.
假设触发了input事件,则v-model 可以简写成。1
2<ChildComponent v-model="pageTitle" />
<ChildComponent :value="pageTitle" @input="pageTitle = $event" />
而多数情况下,我们在子组件会绑定事件通过this.$emit(‘update:title’, newValue)来回传给父组件。 我们会这么做:1
<ChildComponent :title="pageTitle" @update:title="pageTitle = $event" />
Vue2.x 中的.sync就帮我们做了类似这样一件事。可以简写成1
<ChildComponent :title.sync="pageTitle" />
但在Vue3.x , .sync 已被废弃。取代的是 v-model:属性
v-model:的好处就是可以绑定多个 v-model:title1 = “pageTitle1”, v-model:title2 = “pageTitle2” 。
因此:迁移替换1
2
3<ChildComponent :title.sync="pageTitle" />
<!-- 替换为 -->
<ChildComponent v-model:title="pageTitle" />
对于不带属性的v-model,确保分别将 prop 和 event 命名更改为 modelValue 和 update:modelValue
如:
1 | // ChildComponent.vue |
VueDraggable4.x 适配
1 | 组件菜单box1: |
box1对菜单进行clone, box2 绑定v-model, list2发生变化。在拖入结束事件@end中需要同步更新到外界父容器。1
2
3
4
5
6
7
8
9
10
11
12
13
14
15
16
17
18
19
20
21
22 emits: ['update:modelValue','mpContainerItemAdd','mpContainerBgColorChange'],
props: {
modelValue: Array,
list1: {
type: Array,
required: true
},
dropConClass: {
type: Object,
default: () => ({})
},
mpContainerBgColor:{ //小程序背景色
type: String,
default:'#666666'
},
},
data () {
return {
options1: {name: 'drag_list',pull:'clone',put:false}, //clone表示赋值,左侧无需删除节点。
containerBgColor:'#ffffff'
}
},
cloneMenuItem 事件对属性节点进行克隆。 handleEnd事件当从左侧拖入到box2完成时将list2数据源同步到父组件。
已完成主要逻辑适配。详细拖拽逻辑,组件交互请参考源码。Vue3.x版本其他兼容请咨询作者一起探讨。